Documentation
The documentation for the premium version is located on the separate page. The premium version provides the features of the base version listed below and more!
- Introduction
- Video tutorial
- Installation
- Import of Google 3D cities
- OpenStreetMap import from the server
- OpenStreetMap Import from a local file
- Terrain import
- Image overlay import
- GPX import
- Import Settings
- Roads and Paths
- Tips and Tricks
- Limitations
- Links and Contacts
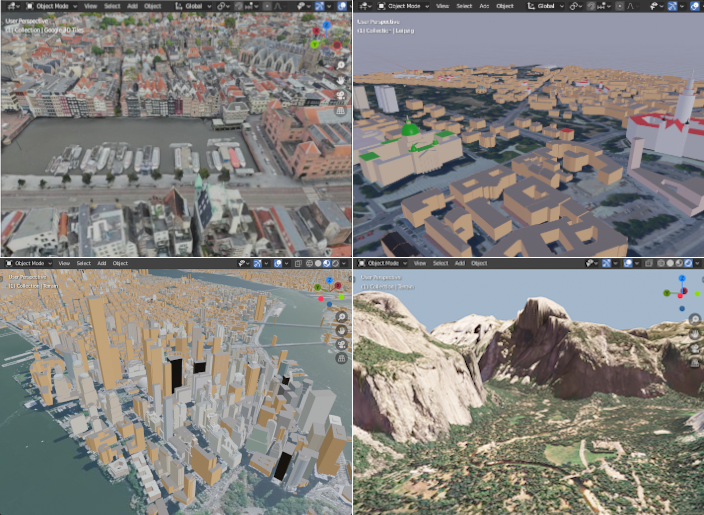
Blosm is an addon for Blender, formerly known as Blender-OSM. It provides a few clicks import of Google 3D cities, OpenStreetMap and terrain data with global coverage.
You might prefer to pay some price for the addon to support its development. However it is completely optional. The addon source code is available under GPL license!
The following items can be imported by the addon:
- Buildings. Building height and number of floors are used to create the final scene. Composition into 3D parts for a building with the complex structure is also processed. A large number of roof shapes is supported: flat, gabled, hipped (for a quadrangle outline only), mono-pitched, half-hipped, round, pyramidal, gambrel, dome, onion and saltbox. If a terrain is provided, buildings are placed on the terrain automatically.
- Water objects (rivers and lakes). Imported as polygons. Coastlines for seas and oceans are importes as edges. If a terrain is provided, polygons for water objects are projected on the terrain.
- Vegetation areas (forests, grass, scrubs). Imported as polygons. If a terrain is provided, polygons for vegetation areas are projected on the terrain.
- Imported roads, paths and railways have width. They are represented by Blender curves with a profile object.
- Terrain. Blosm downloads and imports real world terrain data with global coverage and the resolution about 30 meter. More information.
- GPX-tracks. Blosm can import GPX-tracks and project them on the terrain.
Polygons with holes are supported!
There is a video tutorial created by Nicko16: https://www.youtube.com/watch?v=Thx08Q4etVc. It was made for the premium version, however it's almost totally applicable for the base one.
It is recommended to use the latest official stable version of Blender from https://www.blender.org/download/.
Get the addon here. You will get a zip archive with the name blosm_2.7.5.zip. Do not unpack it! If you are on Mac and it unpacked the file automatically, compress the folder back to blosm.zip.
Install the addon via the usual Blender way:

- Delete the previous version of the addon if you have one:
-
Edit → Preferences... → Add-ons

- Type osm in the search box
 to find the addon
 - Press Remove
 button_
-
Edit → Preferences... → Add-ons
-
File → User Preferences... → Add-ons → Install...

- Find the file blosm_2.7.5.zip in your file system and press Install from File... button
- Enable the addon by checking the Enable Add-on

- Set a directory to store downloaded OpenStreetMap and terrain files by pressing the button
 . It makes sense to create a special directory for that. It's strongly recommended to uncheck the option Relative Path in the file dialog when setting that directory as shown here. Press the key
 Nto toggle the panel with the option Relative Path in the file dialog. - Optional.
To use satellite imagery from ArcGIS location service, enter your ArcGIS access token in the field ArcGIS access token  . If you don't have it, press the button Get it!
  to get one for free. See the instruction Getting ArcGIS access token on how to get it.
To use satellite imagery and web maps provided by Mapbox company, enter your Mapbox access token in the field Mapbox access token  . If yout don't have it, press the button Get it!
  to get one for free. See the instruction Getting Mapbox access token on how to get it.
A Google 3D Tiles Key is required to import Google 3D cities. Enter your Google 3D Tiles Key in the field Google 3D Tiles Key  . If you don't have a Google 3D Tiles Key, press the button Get it!
  to get one. Note that a valid bank card number is needed to setup a billing account required to get the Google 3D Tiles Key. However your use of Google 3D Tiles in the Preview stage will be free of charge bound by the usage limits. Don't forget to enable the Maps Tiles API as described here. Also, you shouldn't apply any restrictions to your 3D Tiles Key.
- Perform a quick test of Blosm. The addon panel is located on the
Blosmtab of the right side panel of the Blender 3D View (see the image below). The panel is toggled with the
 Nkey. Simply press the button import . In a few seconds the old town of Leipzig in Germany should appear in Blender.
- Import of Google 3D cities
- OpenStreetMap import from the server
- OpenStreetMap Import from a local file
- Terrain import
- Image overlay import
- GPX import
Please read the dedicated page.

- Press the button select
 to select a map extent for your area of interest. A browser window pops up with the special page to select the map extent. Follow the instructions on the webpage. At the end of this step you will have a string with coordinates copied to the clipboard. Now return back to Blender.
 - Press the button paste
 to paste the coordinates of your area of interest.
 - If you want to place OpenStreetMap buildings and other objects on the terrain, download and import the terrain first by setting the value of the drop-down list
 to terrain. Further details about terrain download and import can be found here. At the end of terrain import a Blender object for the terrain will be set automatically in the field
  . You can also set a Blender object for the terrain imported before. Actually an arbitrary Blender MESH object can be set as a terrain in the field . Leave that field blank to place all imported OpenStreetMap objects on the zero level.
 - Blosm comes with reasonable default settings. However you might want to tweak some of them as described in Import Settings
- Optional: toggle Blender System Console to track the progress of download and import of OpenStreetMap (Window → Toggle System Console).
- Press the button import to start download and import of OpenStreetMap data.
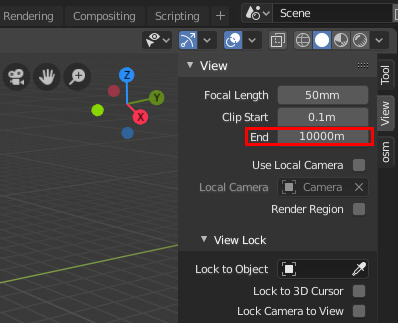
- The imported scene can be dozens of kilometers wide! It makes sence to set the far clipping distance of the 3D View at least to 10 thousand! The setting is located on the right side panel of the Blender 3D View (see the image). The panel is toggled with the
Nkey. You may also want to increase the far clipping distance of your render cameras. - Enjoy the imported scene!
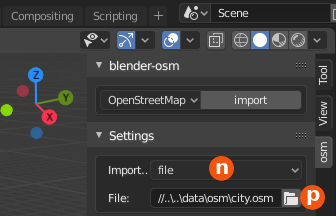
- Important! Do not forget to set a directory in the addon preferences to store downloaded OpenStreetMap and terrain files as described in the installation instructions. The directory is set in the field
 on the image above.
 - Set the value of the drop-down list
 to file (see the image above).
 - Select an OpenStreetMap file on your local disk by pressing the button
 as shown on the image below:
- The rest of the steps is the same as for the OpenStreetMap import from the server. Note that the GUI for selecting a map extent is not shown since the map extent is defined by your OpenStreetMap file.
- Set the value of the drop-down list to terrain (see the image above).
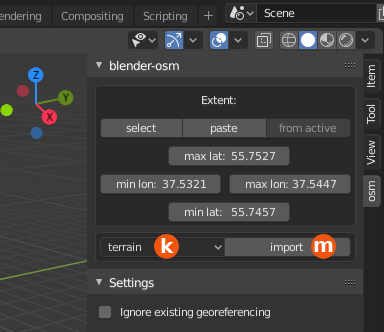
- Select a map extent for your area of interest as described at the beginning of OpenStreetMap import from the server. If the map extent was set before, you can skip this step.
- Optional: toggle Blender System Console to track the progress of download and import of the terrain (Window → Toggle System Console).
- Press the button import
 to start download and import of the terrain.
 - The imported terrain can be dozens of kilometers wide! It makes sence to set the far clipping distance of the 3D View at least to 10 thousand! The setting is located on the right side panel of the Blender 3D View (see the image). The panel is toggled with the
Nkey. You may also want to increase the far clipping distance of your render cameras. - You may want to edit the mesh of the imported terrain in the Blender EDIT or SCULPT modes. In the EDIT mode you may find useful proportional editing.
- Now you can set the value of the drop-down list to OpenStreetMap and import OpenStreetMap from the server or from a local file.
The addon supports import of a number of image overlay types:
- ArcGIS Satellite: satellite imagery provided by ESRI company. It's required to provide an access token in the addon preferences.
- Mapbox Satellite: satellite imagery provided by Mapbox company. It's required to provide an access token in the addon preference.
- OSM Mapnik: a general-purpose web map displayed at openstreetmap.org
- Mapbox Streets: a general-purpose web map generated by Mapbox company out of OpenStreetMap data. It's required to provide an access token in the addon preference.
- Custom URL: a web map based on a custom URL template. Examples of valid URL templates are given in the dedicated subsection.
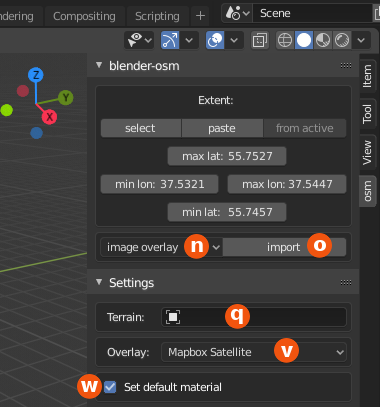
- Set the value of the drop-down list to image overlay.
- An image overlay can be projected either on the imported terrain or on a flat mesh created during the overlay import. To project the image overlay on the imported terrain, set the Blender object for the terrain in the field
 . Note that the addon sets the value of the field to the Blender object for the terrain after the terrain import. To project the image overlay on the flat mesh, keep the field unset and select a map extent for your area of interest as described at the beginning of OpenStreetMap import from the server.
 - Select an image overlay type in the drop-down list
 .
. - If you selected Mapbox Satellite as the image overlay type, be sure to set Mapbox access token in the addon settings as described in the Installation.
- If you selected Custom URL as the image overlay type, enter the URL template in the field below the drop-down list . Examples of valid URL templates are given in the dedicated subsection.
- By default the option Set default material
 is checked. It means that a default Cycles material from the asset pack supplied with the addon will be applied to the Blender MESH object serving as a terrain. The imported image overlay will be used by the Image Texture Cycles node of the Blender material. If that option is unchecked, the imported image overlay can be still found among Blender images in the Blender's UV/Image Editor under the name overlay.
 - Press the button import to start download and import of the image overlay.
- The download progress will be displayed on the Blender 3D View area. If a specific image tile was downloaded before and is available in the addon data directory set in the addon preferences, then the cached version of the image tile will be used instead of downloading it again.
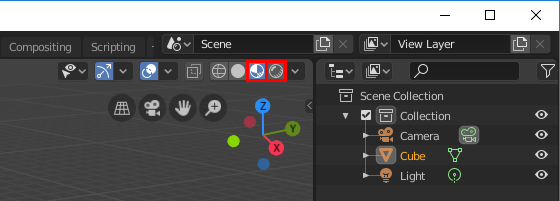
- Set the option Viewport Shading to Material Preview or Rendered to see textured terrain. The option is normally located at the top of the Blender 3D View as shown on the screenshot. Normally the terrain texture is projected on the Blender MESH object serving as a terrain. But it can be found any time among Blender images in the Blender's UV/Image Editor under the name overlay.
Two types of the custom URLs are supported:
- A URL template with the symbols {x}, {y}, {z}.
- Mapbox style URL of the form mapbox://styles/...
This image overlay type is based on a custom URL template, that defines a tiling scheme for the web map. Simply copy and paste the URL template as is. No edit of the URL template is necessary. The template should contain the symbols {z} (zoom level), {x} (horizontal tile coordinate), {y} (vertical tile coordinate). For example:
-
http://tile.openstreetmap.org/{z}/{x}/{y}.pngfor the default OSM map at osm.org (also known as Mapnik) -
http://mt.google.com/vt/lyrs=s&x={x}&y={y}&z={z}for satellite imagery provided by Google. Important: use it on your own risk since this way of using contradicts the terms of use of Google Maps -
http://mt.google.com/vt/lyrs=m&x={x}&y={y}&z={z}for the standard map provided by Google. Important: use it on your own risk since this way of using contradicts the terms of use of Google Maps -
http://mt.google.com/vt/lyrs=t&x={x}&y={y}&z={z}for the terrain map provided by Google. Important: use it on your own risk since this way of using contradicts the terms of use of Google Maps
Design a map style at studio.mapbox.com. Find your style in the list of styles at studio.mapbox.com and press the button Share your style:

In the pop-up window find the section Developer resources and press the button Copy near the label Style URL:

Paste the copied style URL to the related field in the addon panel. Note that you need to set a Mapbox access token in the addon preferences to use a Mapbox style URL.
An additional action is required to export a terrain texture created as the result of image overlay import.
- Save your Blender file.
- Change Blender's Editor Type to Image Editor.
- In the drop-down list of images select overlay.png:
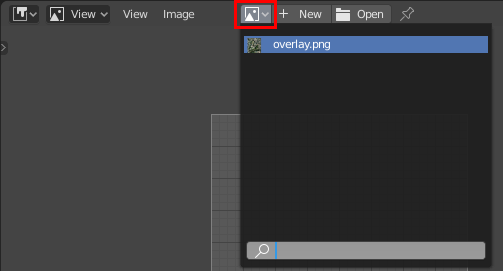
- Press the button Unpack Item:

- In the popup menu select the second option Write file to current directory (overwrite existing file). The texture will be written next to your Blender file.
The addon can import only GPX tracks. GPX routes and way points aren't imported.
A typical workflow is to import the terrain first. Optionally you can import the satellite imagery after the terrain import.
- Set the value of the drop-down list to gpx.
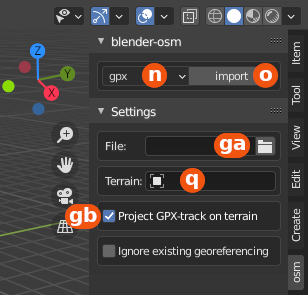
-
Set the path to a GPX track in the field
 .
. -
Check the option
 to project the GPX track on the terrain and ignore vertical coordinates of the track points. A Blender object for the terrain will be set automatically in the field after the terrain import. Uncheck the option to use vertical coordinates of the track points.
 -
Press the button
to import the GPX track. The track will be imported as a Blender curve object.
The addon comes with reasonable default settings. However you might want to tweak some of them.

Import from
The setting defines if OpenStreetMap data will be imported from the server or from a local file.
Terrain
Set a Blender object serving as a terrain to place OpenStreetMap buildings and other objects on the terrain. Blosm can download and import terrain data with global coverage and the resolution about 30 meter (more information). An arbitrary Blender MESH object can serve as a terrain. Leave the field blank to place all imported OpenStreetMap objects on the zero level.
The next setting sets the mode of operation: either 3D or 2D. In the 2D mode buildings are imported as flat polygons.
The next group of settings defines which items will be imported.
Import buildings
If checked import buildings. The addon follows OSM Simple 3D buildings specification in the 3D mode. If a Blender object for the terrain is set, buildings will be placed on the terrain.
The settings Import water objects, Import forests, Import other vegetation, Import roads and paths, Import railways share some common properties. The related OpenStreetMap objects are imported as flat polygons or edges. If a Blender object for the terrain is set, polygons and edges for the OSM objects are cut by means of the BOOLEAN modifier to be within the limits of the terrain. A special Blender object with the suffix _envelope in its name (e.g. Terrain_envelope) is created. The object serves as bounding envelope for the terrain. Also, if a Blender object for the terrain is set, polygons and edges for the OSM objects are projected on the terrain by means of the Blender SHRINKWRAP modifier. You may want to increase the parameter Offset of the SHRINKWRAP modifier to prevent hiding of OSM polygons and edges by the terrain mesh. By default polygons and edges for the OSM objects are also sliced along the global axes X and Y to project them on the terrain correctly. See also the description of the settings Slice flat layers and Slice size below.
Import water objects
If checked import water objects (rivers and lakes) as polygons and coastlines for seas and oceans as edges. You will need to create one or more faces manually for the seas and oceans limited by the edges representing those coastlines. Obviously you can skip this step, if your OpenStreetMap data do not contain any coastline.
Import forests
If checked import forests and woods as polygons.
Import other vegetation
If checked import other vegetation (grass, meadow, scrub) as polygons.
Import roads and paths
If checked import roads and paths as Blender curves with a profile object. Please refer to the section Roads and Paths how to edit the width of a specific road type.
Import railways
If checked import railways as Blender curves with a profile object. Please refer to the section Roads and Paths how to edit the railway width.
Default roof shape
The setting defines a roof shape to use if the roof shape is not set in the OSM file. The default roof shape is flat. It makes sense to set the default roof shape to gabled for a village, which is a reasonable assumption for many villages in the world.
Level height
The setting defines the average level height in meters. It is used by the addon if the building height is defined by the number of levels (i.e. not by the total height in meters). The addon randomizes the level height around the given average level height.
Default number of levels
The default number of levels is assigned to an imported building if the building height (either in meters or in the number of levels) is not set for the building in the OSM file. To achieve realism you can add several default numbers of levels with their relative weights between 1 and 100. Use the buttons + and - to add or delete an entry for the default number of levels. On the screenshot above the default number of levels 5 has the relative weight 40, while the default number of levels 4 has the relative weight 10. It means that a building will get 5 levels 4 times more often than 4 levels.
Import as a single object
Imported objects are arranged into layers. Those layers (further referred to as addon layers) are not to be confused with Blender layers! The addon layers are defined by the settings mentioned above: buildings, roads and paths, railways, water, forests, vegetation.
☑ Import as a single object checked
This is the default state of the settings.
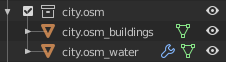
OSM elements belonging to a specific addon layer are imported as the single Blender object, so a separate Blender object is created only for each addon layer (not for each OSM element).
_________________________________________________
☐ Import as a single object unchecked
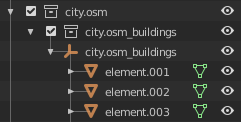
An OSM element is imported as a separate Blender object and parented to a Blender EMPTY object representing the related addon layer. A complex building composed of several parts is imported as a single Blender object in the 3D mode. Only the building outline is imported for that complex building in the 2D mode.
All OSM tags of each imported OSM element are set as Blender custom properties for the related Blender object:

If a Blender object for the terrain is set, the setting Import as a single object is assumed to be checked for the flat addon layers (water, forests, vegetation, roads, railways), but the actual value of that setting is still taken into account for buildings.
Relative to initial import
If checked, the current import will be made relative to the initial one instead of Blender's zero point, provided that there were previous imports with the Blosm addon. If unchecked, the previous imports will be ignored and the current import will be made relative to Blender's zero point.
Roads and paths are imported as Blender curves with a profile object.
The profile objects for the roads and paths are located in the Blender collection way_profiles . A specific profile object is set for each type of a road or path. The width of the specific road type can be adjusted by editing the related profile object in the following way:
- Select the Blender curve representing the desired road type.
- Go to the curve settings in the properties window to see the name of the Blender object for the curve profile. It's set in the GUI field Object in the Geometry panel and Bevel sub-panel:
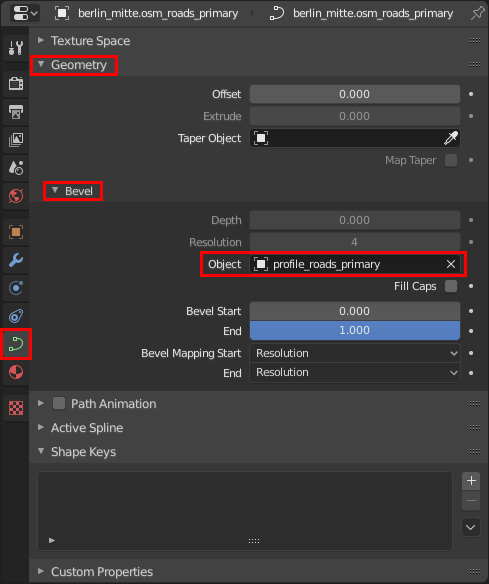
- Enable the Blender collection way_profiles in the viewport. Enable the Blender object for the desired profile. The roads profiles are located in the close vicinity of the origin of the Blender coordinate system.
- Select the related road profile and press
Tabto start editing it the EDIT mode. - Perform scaling of the profle vertices or simply move them. The corresponding road or path will change interactively as you edit its profile.
- Press
Tabagain to finish editing the road profile.
To convert Blender curves to mesh, select the desired curves, press the right mouse button and select Convert to Mesh in the context menu.
Set far clipping distance of the 3D View and your render cameras at least to 10 thousand! The imported scene can be dozens of kilometers wide!
Take care with large .osm files (hundreds of megabytes and more)! For example, an OSM file used to create the scene of New York center shown on the very top image had the size of 350 Mb. It contained more than 100.000 buildings. It took about 1 hour to import the file. Even larger .osm files may hang up your computer completely.
Color and physical material for the walls and the roof aren't set for each building in an OSM file. If they are missing, the addon applies the default Blender materials for the walls and the roof. Those default Blender materials have the names wall and roof respectively.
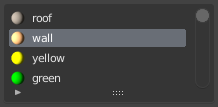
You can edit the Blender materials wall and roof or replace them with your own.
Note. Unfortunately it works only in Blender 2.8x due to external dependencies introduced in the recent version of the binaries used by the bpyproj addon. Some technical details can be found here.
To use a custom map projection defined by a SRID (e.g. EPSG:3857) or by PROJ.4 parameters (e.g. +proj=tmerc +a=6378137 +b=6378137 +lat_0=55.752 +lon_0=37.618 +k_0=1 +x_0=0 +y_0=0 +units=m) install and activate the bpyproj addon. Extra GUI fields will appear at the bottom part of the Blosm GUI panel. To return the default Blosm projection simply deactivate the bpyproj addon. See the bpyproj documentation for additional details.
- Hipped roofs are supported only for a quadrangle building outline
- Only simple diffuse materials are applied to the imported objects at the moment.
- Blosm addon
- e-mail: prokitektura+support@gmail.com
- facebook: @prochitecture
- twitter: @prochitecture
- blenderartists.org: thread
post questions, nice renderings created with the addon and your experience with the addon - bugs and feature requests: issues